Saturday 14 May 2016

Another illustration why mandatory IP changes for DSL subscribers are a royal PITA

Originally this was a different article where I wrongly accused OpenDNS of blocking perfectly harmless websites, more specifically my favourite internet radio station, Radio Paradise. Eventually it proved to be a case of utter confusion caused by factors that only became apparent after some sleuthing.

Long story short, I was suddenly locked out from certain websites due to OpenDNS filters that some other customer of the same DSL service had previously set up. This customer may have been unaware that IP addresses on this service are forcibly changed every 36 hours, and did not take the necessary steps to keep their OpenDNS account up-to-date. When I received the same IP from the dynamic address pool, I also inherited the blocks. Eventually my only way out was either removing the OpenDNS servers from my config, or waiting 36 hours, or resetting the modem to get a new IP. This again makes me wonder why ISPs still enforce this idiotic IP change on customers. It is ineffective in preventing people from running servers because that can be mitigated mostly through a dynamic DNS. I guess this is simply another case of artificially degrading a product in order to be able to sell a ‘premium’ product with a static IP, at a higher price.


Here's the entire detective story for the interested.
On a certain day, I suddenly saw the following when I tried to visit the Radio Paradise site:


OpenDNS: This domain is blocked due to content filtering.

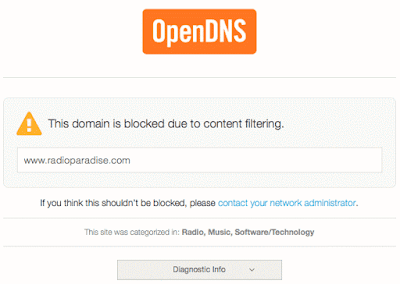
The OpenDNS servers 208.67.222.222 and 208.67.220.220 have been in my system settings for many years, and never had I seen this kind of block. Actually I had specifically switched to those servers to circumvent some idiotic blocks that were implemented in my ISP's DNS servers.


Radio Paradise being blocked made no sense at all. At first sight, there were only two plausible explanations:

  1. Somehow I was now being defaulted to one of the OpenDNS flavours that filter potentially offensive content.
  2. Some law prohibits listening to USA radio streams from within Belgium, and OpenDNS enforced this.
The second explanation was very implausible because I have never heard of any law like that, it certainly would have caused a ruckus on the Web. The first explanation seemed plausible because from a quick glance at the OpenDNS home security plans, it appeared that ‘Family Shield’ is the default when merely using the OpenDNS servers without configuring anything. Then I noticed this actually required configuring different servers, but nothing changed when I did: RP was still blocked. Hence I assumed that using OpenDNS without creating an account, had become equivalent to Family Shield.

This (incorrect) assumption implied two things: first, RP would somehow have been considered ‘adult’ content and second, many visitors would suddenly be locked out. They would need to go through the effort of creating an OpenDNS account to choose what is being blocked. For DSL subscribers whose IP is forcibly changed at regular intervals, this would be particularly annoying because they also need to install a daemon that keeps their IP address up-to-date with their OpenDNS account.

Even though the apparent ‘adult’ categorisation of RP still made no sense, this angered me enough to write an article where I accused OpenDNS of behaving like the great firewall of China. I also posted this on the Radio Paradise forum. No other OpenDNS users could reproduce this problem however, they did not see certain websites suddenly being blocked. In the meantime I also had created an OpenDNS account, which requires registering the network you're currently on. This proved impossible: the IP address was already registered! These two facts lead to the ‘eureka’ moment and the conclusion I started this article with. I immediately reset the modem to force it to obtain a new IP and indeed: everything worked as before.

This does illustrate that maybe OpenDNS could have done a better job at detecting that someone tried to register a static network with an address that belongs to a dynamic address pool, although I do realise this is not a trivial task. I now have added my home network to the OpenDNS account and installed an update client to keep the dynamic IP in sync, but I'm not sure if this will prevent this same scenario in the future. Well at least now I know how to fix it and how I can use OpenDNS to block the things I want, like spam domains or annoying ads that slip through Adblock, so this whole story does have a happy ending.

Saturday 16 April 2016

The ‘manual feed’ icon on printers: less than helpful

Only seldom I need to use the manual feed on printers. The interval is generally long enough that I have totally forgotten how I need to insert the paper in order to get the image printed on the correct side of the paper. When using the manual feed, it is almost always crucial to know what side will be printed on. In an attempt to clarify this to users, manufacturers provide an icon on the manual feed tray:

Manual feed icon

The problem with this icon is that it is less than helpful. What does it mean? It shows a page with apparently a blank and printed side. This can either mean:

  1. The printer will print on the side shown as having print in the icon, in this case the bottom side.
  2. If you insert a page, make sure the blank side, which will be printed on, is pointing upwards.

Both interpretations make sense and no sense at the same time. The first interpretation fails because it does not match with reality: the underside of the real piece of paper will generally not have anything printed on it at the moment it is inserted in the tray. In the very common case of using the manual feed to print on the other side of an already printed page, reality is opposite from what the icon depicts. The second interpretation fails in the cases where one wants to print on a truly blank piece of paper, e.g. on the glossy side of photo paper.

The last time I was faced with this conundrum and failing to find anything useful about it in Google, I simply tested it, and the first interpretation proved correct: this printer (HP) will print on the bottom side of the paper. Mind how I say: “this printer,” because I deem it possible that there are other manufacturers who use the second interpretation. Because as we all know, the only thing printer manufacturers want, is to piss off consumers.

This icon also fails to clarify what the top side of the page will be, except for those people who have a habit of folding dog ears on the top of every piece of paper they insert into a printer. Common sense however dictates that the side that first enters the printer will be the first to be printed on.

If I would have a go at designing a better icon, it would be something like this:

Proposed improved icon

The disadvantage is of course that this icon is not universal and may need to be adapted to the specific printer model.

Friday 11 March 2016

Undoing yellowing on ABS plastic like LEGO® bricks and old computer cases

Every owner of vintage computer hardware or older LEGO® sets will know the problem: the plastic that used to have a bright white or neutral grey colour, tends to turn yellowish or even brown over time. I used to believe this was an irreversible ageing process, until I did some research. My first find was a YouTube video presenting a rudimentary way of bringing back the bright white colour of LEGO® bricks. Further research led me to the Retr0bright project which presented a more advanced technique than the video.
Bromine.
Original photo by Jurii (license)

The culprit proves to be the flame retardant inside the ABS plastic. It is based on Bromine, which is not a big surprise because it has the same typical brown colour as gradually appears on the affected plastic parts. When exposed to UV radiation (which is present in sunlight), the bromine compound reacts with oxygen, causing the colour change. Ironically, the method to reverse this discolouration relies on the same UV radiation. The trick is to add hydrogen peroxide (H2O2) to the mix, which encourages the bromine compound to release the oxygen atom and put hydrogen in place, which undoes the colour change.

That is the basic idea behind the process. A refinement can be made with a chemical called TAED which can act as a catalyst to greatly speed up the reaction. This chemical happens to be an ingredient of typical “Oxy” laundry booster, so it is readily available.


I did some experiments of my own on some old LEGO® bricks of which I assumed they were doomed to be eternally bereft of their original bright white colour. As you can see in the above photo, the results are quite spectacular. Those are the same bricks (if you look carefully, the legs still have the speck of dirt on their left side). The above experiment was done with H2Oonly, and it took several days to obtain those results. The next experiment was done with Oxy added, which provided results much quicker:


The Retr0bright project used to have a wiki explaining how to make and use an optimal mixture for restoring old ABS plastic. Unfortunately this wiki is now down, and accessing it through the Internet Archive is slow and often incomplete. Therefore I will try to summarise the essential information here for easier reference, backed up by my own experimental results.


Caveats and general remarks

You will be working with hydrogen peroxide. Any solution between 3% and 30% strength can be used. The 3% variety is easily found in the pharmacy section of supermarkets etc, and won't do any harm if you only leave it in contact with your skin for no longer than a few dozen seconds. Up to 10% can be obtained from hairdressers, it is used for bleaching hair. This is more dangerous and skin contact should be avoided, also ensure it does not get into your eyes: wear goggles. Stronger solutions are more dangerous: 30% can produce instant painful burns, so never handle it without proper precautions. Needless to say: if you are a kid, you should not attempt any of this without adult supervision.

As with many chemical reactions, this one is dependant on temperature too. From my experiments, this proves to be an extremely important factor. It seems the reaction only really provides any results at all from 15°C (60°F) on, and only really starts to catch on at 20°C (68°F). Warmer means faster, but I do not recommend going above 30°C (86°F) if you want to leave the parts unattended for a longer time period. Certainly avoid going above 40°C (104°F) because parts could start to deform.

Ensure the parts are submerged at all times. Any part that is partially submerged risks developing a white sheen at the liquid-air boundary. If this does happen, it might be possible to remove the sheen by ‘burnishing’ it, i.e. rub another smooth and hard object against it. For LEGO, you could try a slightly harder plastic object like the brick remover.

More is not always better: do not be tempted to add more Oxy, stronger peroxide, heat, or stronger UV light. At some point you will be damaging the plastic beyond repair if you do.

Basic method

This method is easy and cheap, but not always practical.

  1. Find a transparent recipient large enough to hold the plastic parts you want to restore. Cover the bottom outside with tin foil, preferably with the matte side up (this will reflect light more evenly). You can also apply tin foil to the side of the recipient that points away from the UV source. If you really want to provide the most uniform lighting, put the recipient on a slowly rotating turntable.
  2. Pour the hydrogen peroxide solution into the recipient, enough for the parts to be submerged.
  3. Submerge the parts and ensure they cannot float up again, e.g. by placing a glass plate or something else transparent over it. Do not stuff too many parts together: ensure the light can reach every part.
  4. Place it in direct sunlight, or under a UV lamp that outputs a decent amount of light. For a 15 W lamp, do not put it closer than 25 cm (10 inches).
  5. Wait, stir up the recipient occasionally to let bubbles escape and to turn around parts, and take out and rinse the parts when they appear to have bleached sufficiently.
Bubbles
This method works OK, but may be slow, although it can go surprisingly fast when the liquid is warmed up to about 30°C. On a hot summer's day, parts can go from brown to bright white in a few hours. The advantage is that the peroxide solution will generally last long and can be reused. As long as you see bubbles forming on the plastic parts, the solution is still active. If no bubbles form within 5 minutes even when the solution is warmed up to 30°C, it has decomposed into plain water and must be replaced.


Faster method

  1. Do the same as above, but add a small amount of “Oxy” laundry booster to the mix. You should not add more than about 1/4 teaspoon per half litre of solution. Ensure it is well-mixed, you could dissolve the Oxy in a bit of warm water before adding it.
  2. Ensure the solution stays at about 25°C, or 30°C if you want it to go really fast.
  3. Monitor the solution carefully at regular intervals. As soon as it stops bubbling, remove the UV light source and take the parts out. If they are not yet sufficiently bleached, make a new solution.
This method can provide spectacular results within hours, even at moderate temperatures. The problem is that the solution will break down much faster, and as soon as the peroxide is gone, the UV light will again start the yellowing process. It is therefore essential to stop when the peroxide is exhausted.

Only add the Oxy when you're going to start using the solution. It cannot be stored for a long time with the Oxy added, unless perhaps you cool it down to near-freezing temperature, but I do not guarantee this.

The disadvantage is that the Oxy generally also contains detergents which will cause foam, especially with the peroxide bubbling. This will stop after a while though. The detergents may also leave a dull residue which needs to be washed off the parts. Also, see my comments about coloured parts below.

Efficient method for large parts

The above methods are unpractical for large parts like computer cases, keyboards, or LEGO® baseplates. For those, it is better to create a gel as proposed by the Retr0bright project, which can be applied to the surface with a brush. Simply place the parts with gel applied to one side in the UV light (or sunlight) and check on them regularly. Then repeat for the other side. On the Retr0bright website you can see a spectacular example of what this method did for a horribly discoloured Commodore 64, with repeated applications within a timespan of only eight hours.

I have not tried this myself yet, but a good recipe for the gel seems to be the original Retr0bright one:
  • 500ml of 10% to 15% hydrogen peroxide solution (dilute it down with distilled water if you have a stronger solution).
  • 2 heaped tablespoonfuls of Xanthan gum
  • 1 level teaspoon of Glycerine
  • 1/4 teaspoon of Oxy. Again, do not add the Oxy until you're about to apply the gel.
The same remark about temperature holds: try to keep the parts between 25 to 30°C. Ensure the gel does not dry out, replace it if it starts to dry.

Although in theory it could be omitted, the Oxy is very helpful for this method because the gel dries up within hours, therefore we can really use the extra speed from the TAED catalyst to save us from having to reapply new gel too many times.

If you do want to omit the Oxy, you will need to ensure the parts are kept at a temperature between 30 and 40°C while being exposed to the UV light, otherwise the gel will work unpractically slowly. You may be lucky that the sunlight provides exactly the right amount of heat, but for an indoor setup with UV lamp, you would need to find a way to warm up the parts to the right temperature without causing the gel to dry up quickly (a heater with a fan is obviously not a good idea).

What about coloured parts?

For LEGO®, the parts that suffer the most from yellowing tend to be the white, blue, and grey ones (obviously, on colours like yellow or red, a lot of additional yellow needs to be added for it to become visible). For white, there is not really a problem: you cannot overdo the bleaching. For colours however, the story is different, and from my experiments I can only conclude that results are unpredictable.

The hook and bottom blue plate were treated, and ended up too pale.

I tried the second method (with Oxy) on both a blue brick and grey hook that had badly discoloured. At first it got better, but in the end both parts were bleached beyond their original colour. However, I do have obtained quite good results by only using peroxide, with other bricks that were less yellowed to start with. I suspect two things: first, the pigments themselves were already damaged by the exposure to sunlight, making it impossible to restore the colour of really badly yellowed parts (unless someone would find another clever chemical process to revert that reaction). The yellow or brownish tint can be removed, but the original colour cannot be fully restored. Second, chemicals in the Oxy might further damage the pigments. I would avoid using Oxy with coloured parts. My intuition tells me that the risk of damaging the colours will be lower, the less chemicals you add to the mix, so the peroxide-only method seems safer.

If you have a really badly yellowed blue or grey part, I recommend using peroxide only without Oxy, and regularly checking on its status. Avoid strong UV exposure because it could further damage the pigments. Take the part out of the liquid as soon as it looks good enough. Maybe a slightly yellowed darker colour is preferable over a yellow-free bleak colour. You will have to accept that it may not be possible to get back the original appearance. Anyone who has more experience with restoring coloured parts, be sure to leave a comment.

As for imprints and stickers on the plastic, these will generally not be harmed by the peroxide, although I cannot give any guarantees. If you want to err on the safe side, your best bet is to use the gel method and avoid applying gel over printed logos or any other non-ABS parts.

Do ABS parts made today still suffer from yellowing?

Wikipedia states that the use of bromine-based flame retardants is declining in the Western world. I have no concrete information about this, so I did a small experiment on a recently bought LEGO® part from Pick-a-Brick. I placed it under the same UV lamp used for the above experiments, for several days. The result was no visible effect whatsoever, so I am inclined to say that recent LEGO® parts are less susceptible to yellowing than the ones from the nineties and earlier. Nevertheless, if you plan to exhibit your favourite LEGO® models in a sunlit room, it may be wise to provide some kind of UV shielding.